2010年7月30日星期五
A Surprise Profit From Sony
An unexpected quarterly profit from Sony this morning. With strength finally returning to its television and videogame businesses, the company posted a $293.9 million net profit in its first quarter and raised its outlook for the full year. “Our results for the quarter show that our mainstay electronics business is once again becoming our engine of growth,” CFO Masaru Kato said during the company’s earnings call. “We want to keep up the momentum.” That should be quite a bit easier, now that Sony’s restructuring efforts are starting to pay off.
2010年7月27日星期二
Certification Came Quickly After One-Click Access to WikiLeaks Was Removed
“The U.S. government is probably the largest enterprise I know of,” Google co-founder Sergey Brin said last year. And soon it will be one of Google’s largest customers as well, if the company has its way.
At an event at its Mountain View headquarters this morning, Google (GOOG) announced Google Apps for Government, the first cloud application suite to be certified for government use, the company claims. Identical to the service’s premier edition, Google Apps for Government has been authorized to operate at the FISMA-Moderate level, meaning it is government-certified to handle “sensitive but unclassified” information, a designation given to the bulk of government documents and communications.
“Government has an enormous opportunity to leverage the Web as a platform,” said Dave Girouard, president of Google’s Enterprise division. “IT is a massive part of the government spend each year. It’s where a lot of our tax dollars go. In these days of shrinking budgets and lower tax receipts, cloud computing offers a great opportunity to create a more effective and responsive government.”
Girouard’s point: The cloud-computing paradigm, with its utility model, lack of upfront licensing fees and low ongoing operational costs are almost tailor-made for agencies tethered to costly, difficult-to-manage legacy systems. As CEO Eric Schmidt explained, “If you think about government services, almost all of them are well suited for Web apps. The fact of that matter is that things like renewing your driver’s license, requesting a copy of you birth certificate are all perfectly suited to Web services.”
But only with the proper security. To that end, Google says it has built a segregated infrastructure exclusively for Apps for Government and that any customer data it stores will be located in the United States only. Federal security certification came through last Thursday. “We view trust as the ultimate hurdle for cloud computing and we want to be the first to overcome it,” said Girouard.
And then?
Claim as much of the market as it can. “We’re quite committed to enterprise and cloud computing,” Schmidt said. “And it’s sort of an open field now. For the past 20 years vendors have really controlled the way enterprise software was delivered and there as a lot of lock-in. With cloud computing there’s sort of a jump ball and we have a chance to rethink that….We have a hot product and what we’re doing is knocking down barriers to adoption.” Among the earliest government adopters are the state of Colorado and the Lawrence Berkeley National Laboratory.
2010年7月25日星期日
D’oh! Mark Zuckerberg Set to Befriend Simpsons in Fall Cameo
A half-billion users is cool. But a guest spot on “The Simpsons” is cooler! New York Magazine says Facebook founder Mark Zuckerberg will appear, as himself, on the show’s upcoming season. Plot summary: “In the episode, dubbed ‘Loan-A Lisa,’ Lisa decides to help fund Nelson’s new bike company. While attending an entrepreneurs convention, the two encounter Zuckerberg, who reminds the kids just how many famous billionaires–including himself–have dropped out of school.” The magazine thinks the episode may air in October–right around the release of “The Social Network.”
How to put movies on an iPod
How to put movies on an iPod is always a problem that most iPod users are confused about. There are many tools can help you to convert video on iPod, such as avi iPod Converter for Mac, Mpeg 4 iPod Converter, 3gp converter for iPod and so on. Those tools can help you to put avi, wmv, 3gp, Mpeg on iPod easily. This is the easiest way to put movies on an iPod. You can also put movies from one iPod to another one and from computer to your iPod directly with iPod transfer tools.
This guide includes two Parts:
Part 1: How to put movies on an iPod for Windows (convert & transfer)
Part 2: How to put movies on an iPod for Mac (convert & transfer)
Part 1: How to put movies on an iPod for Windows
A. With Converter
Step 1: Download and install Aiseesoft iPod Video Converter.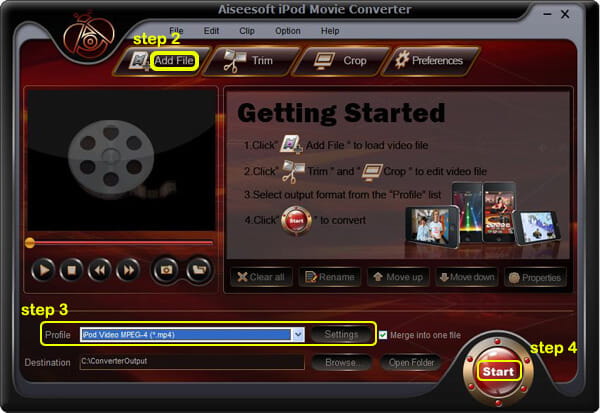
Step 2: Add Video
Click “Add File” button to load your movies that you want to put on iPod.
Step 3: Choose output format
You can choose your output format according to your iPod’s generation from the drop-down list named “profile”. You can also adjust the settings of your output video by clicking “Settings” button.
Step 4: Start Conversion
Click “Start” button to begin your conversion.
B. With Transfer
Step 1: Free download Aiseesoft iPod Transfer.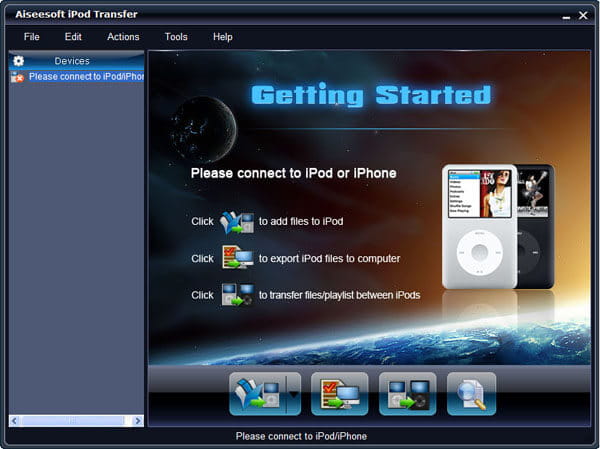
Step 2: Plug iPod
Plug your iPods or iPhones to computer
Step 3: Find movies
Find the movies that you want to put on your iPod from the other iPod.
Step 4: Transfer
Click “Transfer” button
Part 2: How to put movies on an iPod for Mac
A. With Converter
Step 1: Download and install Aiseesoft iPod Video Converter for Mac.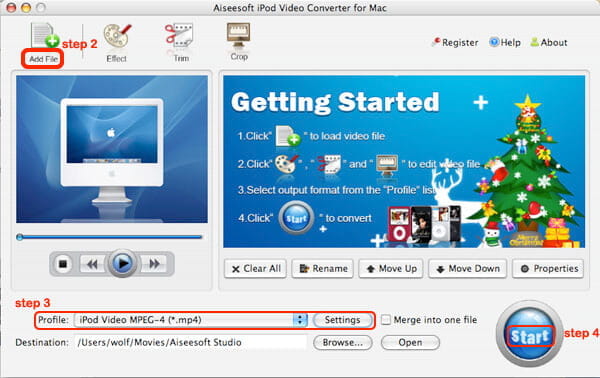
Step 2: Add File
Click “Add File” button to load your movies that you want to put on iPod.
Step 3: Profile and Settings
Choose your output video’s profile from a drop-down list and you can also adjust the settings of your output movie.
Step 4: Conversion
Click “Start” button to begin your conversion.
B. With Transfer
Step 1: Download and install Aiseesoft iPod Manager for Mac.
Step 2: Plug
Plug your iPod via USB cable.
Step 3: Find Movies
Find your movies you want to put your iPod from your local disk.
Step 4: Transfer
Click Transfer button to begin your transfer and seconds later you will get your movies on your iPod.
2010年7月22日星期四
How to share the iTunes Music and videos between two computers for free
Some people may meet that situation: You and your brother both have iTunes library under the same credit card account. Occasionally, you want to get the same song, however you wouldn't want you both to pay the $0.99 where virtually the same account is purchasing the song twice. So how can you and/or he download the songs from each other once it's purchased on a single computer? This is a guide to tell you how to share iTunes Music and videos between two computers such as sharing iTunes Music and videos between Windows PC and Mac OS X, sharing iTunes Music and videos between Mac OS and Mac OS X and sharing iTunes Music and videos between Windows PC and Windows PC
Step 1, Networking computers.
If you want to share iTunes videos and music between computers, you need to network PC and Mac first.
If you do not know how to Network Windows with Mac OS X, go there:
Networking Windows (2000/XP/2003*) with Mac OS X (10.3/10.4)
Information you will need to know
1.The IP Address of your PC (Start > Run > CMD {return} > "ipconfig" {return})
2The IP Address of your Mac (Applications > Utilities > Terminal {Run app} > for ethernet connection "ipconfig getifaddr en0" {return} or for wireless "ipconfig getifaddr en1" {return})>
3.The workgroup the PC is in (Right click on My Computer, select Properties, and select the Computer Name tab)
System Configuration
It is important that the account you log in with on your XP system has a password set, if it does not you will not be able to login to your Windows share from OS X. You need to put your Mac in the same workgroup as your Windows PC. To do this open "Directory Access" (Applications > Utilities > Directory Access). Click on the padlock in the bottom left corner to make changes; you will be prompted for your password. If "SMB" is not ticked off, then tick it off. Select "SMB" and hit the "Configure…" button. Now enter the name of your Windows workgroup. In my case the name is "AD".
Setting up the PC to share files
You need to create and share a folder on your PC that you will then access from your Mac. To do this create a folder (or select and existing one) right click on it from Windows Explorer and select "Properties". Select the "Sharing" tab and share out the folder. I'd recommend you use a one word name for the share. For example "Mac", not "Apple Mac Share", it just narrows the risk of complications.
Setting up the Mac to share files
Open "System Preferences" (Applications > System Preferences). Go to "Sharing" under "Internet & Network", and tick off "Windows Sharing", and if it doesn't start by itself, click "Start". This will share out your entire home folder.
If You're running Tiger (10.4), you will also need to click the "Accounts" button and tick off the box next to your account name so that OS X knows to share out your particular home folder.
Step2, Go to preferences, under the sharing tab, enable "Share library..." and "Look for shared libraries..." on both computers.
Select the items you want to share.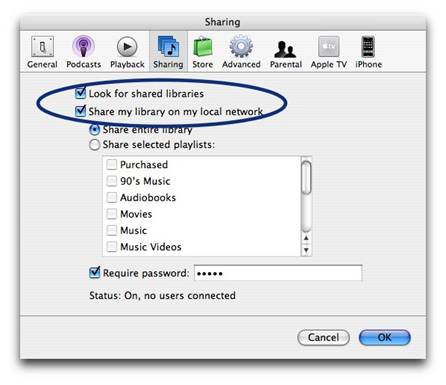
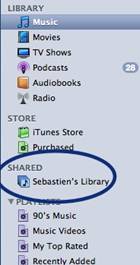
It will show up in iTunes' side panel:
To require users to enter a password before they can see your shared items, select "Require password" and enter a password.
You will need to authorize both computers to play purchased content however. You may authorize up to 5 Machines per iTunes Music Store account.
Tips:If you want to share music with other users on your computer ,read this article: iTunes: How to share music between different accounts on a single computer
Step 1, Networking computers.
If you want to share iTunes videos and music between computers, you need to network PC and Mac first.
If you do not know how to Network Windows with Mac OS X, go there:
Networking Windows (2000/XP/2003*) with Mac OS X (10.3/10.4)
Information you will need to know
1.The IP Address of your PC (Start > Run > CMD {return} > "ipconfig" {return})
2The IP Address of your Mac (Applications > Utilities > Terminal {Run app} > for ethernet connection "ipconfig getifaddr en0" {return} or for wireless "ipconfig getifaddr en1" {return})>
3.The workgroup the PC is in (Right click on My Computer, select Properties, and select the Computer Name tab)
System Configuration
It is important that the account you log in with on your XP system has a password set, if it does not you will not be able to login to your Windows share from OS X. You need to put your Mac in the same workgroup as your Windows PC. To do this open "Directory Access" (Applications > Utilities > Directory Access). Click on the padlock in the bottom left corner to make changes; you will be prompted for your password. If "SMB" is not ticked off, then tick it off. Select "SMB" and hit the "Configure…" button. Now enter the name of your Windows workgroup. In my case the name is "AD".
Setting up the PC to share files
You need to create and share a folder on your PC that you will then access from your Mac. To do this create a folder (or select and existing one) right click on it from Windows Explorer and select "Properties". Select the "Sharing" tab and share out the folder. I'd recommend you use a one word name for the share. For example "Mac", not "Apple Mac Share", it just narrows the risk of complications.
Setting up the Mac to share files
Open "System Preferences" (Applications > System Preferences). Go to "Sharing" under "Internet & Network", and tick off "Windows Sharing", and if it doesn't start by itself, click "Start". This will share out your entire home folder.
If You're running Tiger (10.4), you will also need to click the "Accounts" button and tick off the box next to your account name so that OS X knows to share out your particular home folder.
Step2, Go to preferences, under the sharing tab, enable "Share library..." and "Look for shared libraries..." on both computers.
Select the items you want to share.
It will show up in iTunes' side panel:
To require users to enter a password before they can see your shared items, select "Require password" and enter a password.
You will need to authorize both computers to play purchased content however. You may authorize up to 5 Machines per iTunes Music Store account.
Tips:If you want to share music with other users on your computer ,read this article: iTunes: How to share music between different accounts on a single computer
2010年7月20日星期二
How to convert videos such as MP4, WMV, MOV and AVI to DVD for Free
DVD Flick is a free DVD authoring program that allows you to take a video file saved on your computer and converts it into a DVD that can play back in a DVD player, your computer, or Home Cinema set. The software allows you to add audio tracks and subtitles to your DVD. Your original video files may be in any of the following container formats: AVI, MOV, MPG, WMV, ASF, FLV (Flash video), Matroska and MPG. Supported codecs include MPEG-1, MPEG-2, MPEG-4, XVid, DivX, WMA and WMV (Windows Media Audio and Video), MP3, OGG Vorbis, H264 and On2 VP5/6. The program is open source.
DVD Flick is the all-in-one tool that can convert:
AVI to DVD, FLV to DVD, HDMOV to DVD, MKV to DVD, MJPG to DVD, MPG to DVD, M2V to DVD, MP4 to DVD, M4V to DVD, NSV to DVD, NUT to DVD, QT to DVD, MOV to DVD, RM to DVD, SMK to DVD, OGM to DVD, WMV to DVD, ASF to DVD, 3GP to DVD, 3G2 to DVD for free.
DVD Flick supports DVD Authoring, ISO image creating, DVD burning also in one tool.
System requirements:
- A Pentium or AMD K-6 processor. Pentium 3 or later recommended, the faster the better.
- 64 MB of free physical RAM, 128 MB or more is recommended.
- Windows 2000, Windows XP , Windows Vista (If you are Mac user, use this Mac dvd creator)
Download the latest version of the DVD Flick website
If you are using Mac, Please click here to download the Mac DVD Creator
1. Download and run DVD Flick
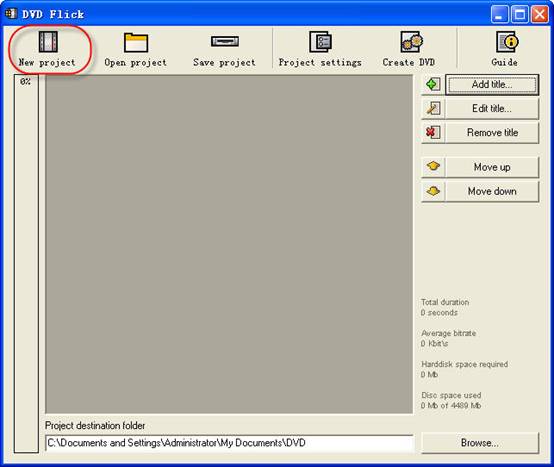
2. Click "New project” button to create a new project.
3. Browse your hard drives to select path to the folder, where the resulting DVD folders
(AUDIO_TS, VIDEO_TS) will be saved. It is highly recommended to use NTFS file system in your OS, cause the temporary m2v files in most cases exceeds 4GB limit for FAT32 file system. Additionally, don't use non-English letters to the browsing path, because the errors could occur during DVD authoring process.
4. Add your title - select the video file or files for the project. DVD Flick supports these video file types: AVI, FLV, HDMOV, MKV, MJPG, MPG, M2V, MP4, M4V, NSV, NUT, QT, MOV, RM, SMK, OGM, WMV, ASF, 3GP, 3G2.
5. Title added. Left bar indicates how many bytes is used on the blank DVD disc with the default preferences. The percentage depends on the video file size which you have added in the previous guide step.
6. Edit title.
(1) General settings for the "Title".
reate chapters every: Purpose of the chapters usage is forward/back skipping forward during the DVD viewing. It is recommended to use this option.
You can also use fixed numbers of chapters - check "Create" button.
Aspect ratio is an auto detected value received from video file's frame dimension.
(2) Video sources for the "Title" - this tab informs us about video codec, frame size, Aspect ratio value, frame rate - Frames Per Second.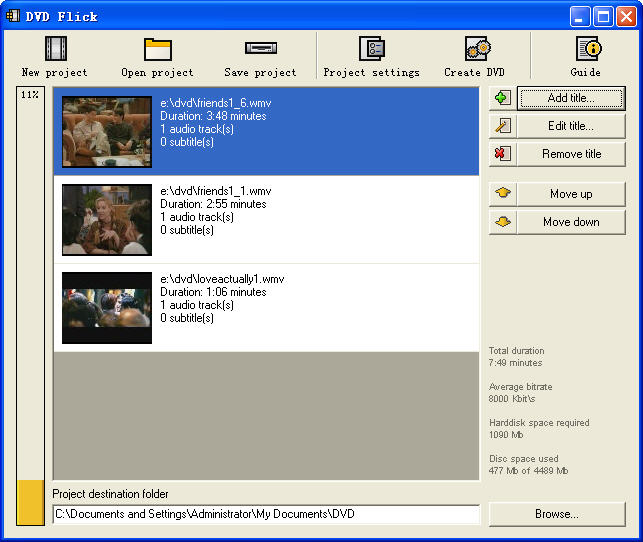
Frame rate. Check the bottom listing:
- 23,976 FPS - NTSC Film Format
- 25 FPS - PAL Format
- 29,97 FPS - NTSC Format
- 30 FPS - NTSC Format Reccomendations for the non-standard
- 12,5 FPS - PAL Format
- 15 FPS - NTSC Format Warning! Remember the format for your file - it will be the same "Target format" in "Project settings" .
Add a file to a title: This option allow to you to add new file or files to the "Title". It could be additional videos for this DVD, cutted scenes for examples, etc. Important thing is the same FPS for the main video file and the additional file.
Remove a file to a title: You can also remove a file to a title.
(3) Audio tracks tab.
Remove an audio track: Press "Edit" button, then remove from the "Audio track sources" additional audio track.
Add an audio track: Press "Add" button on the ”Audio track sources" tab, select the audio file from hard drive, check in the new "select audio track(s)" window track(s) you wish to add. Press "Accept" button. DVD Flick could extract audio tracks from all supported video files (AVI, FLV, HDMOV, MKV, MJPG, MPG, M2V, MP4, M4V, NSV, NUT, QT, MOV, RM, SMK, OGM, WMV, ASF, 3GP, 3G2), and also native audio file formats: AAC, AC3, Flac, MKA, MP3, MP2, MPA, OGG, WAV, WMA
Select language for the additional audio track. Select the audio track, and then select from the”Track language" list box.
(4). Subtitles tab.
Add subtitles. Press "Add" button on the "Subtitles" tab, and then select from disk file with subtitles. DVD Flick supports these subtitles formats: AQT, JS, RT, SMI, ASS, SRT, SSA, TXT. Subtitle settings. Press "Edit" button to change subtitles settings. Select the language you need. Other settings are for the Font, Font size, and placement of the subtitles. As usually, press "Accept" button to save setting. "Force display" option will force subtitle displaying during playback, even they were not selected in menu.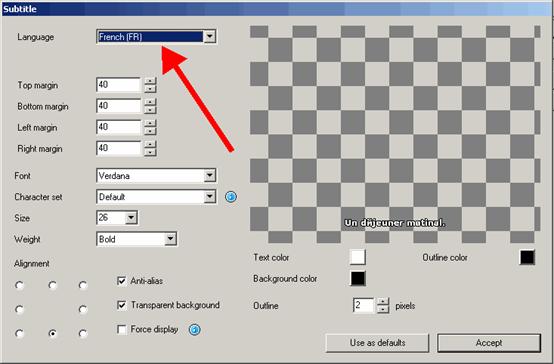
If everything was made rightly, we will see this window with the changed settings for subtitles. There are no more editing tabs for "Title properties". Press "Accept" button to save preferences.
7. Project settings. At the DVD Flick main window press "Project settings" button.
General tab.
Select a "Target size" for your DVD from list box. The default value is "DVD (4,3 GB)", default values could be changed by pressing "Use as defaults" button. If you need to select custom DVD size just scroll up the list box to the "Custom" value and the bottom "Custom size" option will be enabled for editing.
"Encoder priority" allows to you to use "DVD Flick" with high priority in your operating system to decrease full encoding time.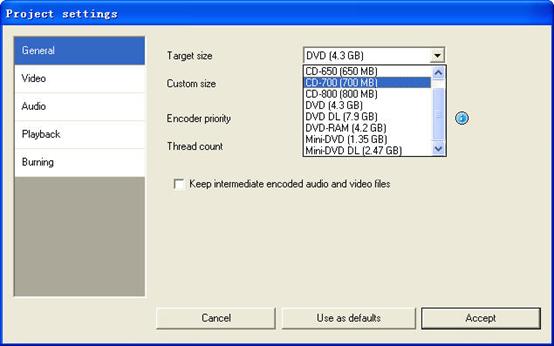
Video tab.
Set your DVD "Target Format".
"Encoding profile" for better encoding performance is highly recommended to select as "Normal" or "Best". "Fastest" and "Fast" mode decrease full encoding time, but with the lower quality results.
"Target bitrate" is more easy to use as "Auto fit". This option will calculate bitrate for encoding automatically depends on DVD "Target size" and will be set as maximum possible value. If you have some advanced experience with DVD encoding, you can set "Custom bitrate".
Set up advanced video options - press "Advanced" button.
Check "Second encoding pass" to improve output encoding results. It is highly recommended to use this option, but it wills increase full encoding time.
Check "Half horizontal resolution" to enable Half D1 DVD Mode - one of the standard for DVD, decreases frame size to 352x576 for PAL and to 352x480 for NTSC (instead of 720x576 (PAL) and 720x480 (NTSC)). Could be used as a possibility to decrease encoding bitrate, for more video length on one DVD disc.
Check "Add overscan borders" to make your DVD with black left and right borders to view all the source video on your TV.
Deinterlace option is not recommended to use.
Check "Force MPEG-2 recompression" to recompress your mpeg-2 video source files, do not check option if m2v files were encoded with Cam Video Tool 4 DVD Flick.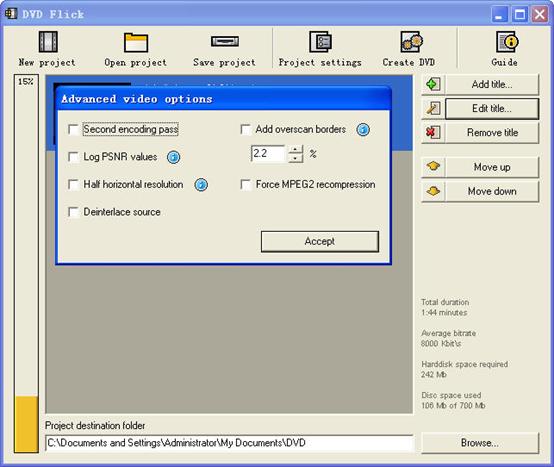
Burning tab.
If the "Create ISO image" is set, the ISO image file will be created on your disk, in the "Project destination folder". ISO image could be useful, if you prefer to burn DVD using another application, supporting ISO images. "MDS" (Media decriptor) file will be created also. If you want to burn your DVD with DVD Flick, check "Burn project to disc" (red arrow). if you are using DVD+RW, DVD-RW disc, check "Automatically erase disc if it is rewritable". If quick erase will be not possible, ImgBurn (included in DVD Flick installation package) will make full erase for rewritable discs.
Accept all "Project settings" using "Accept" button. Now we are ready to burn our DVD.
8. Create DVD.
Press "Create DVD" button at the main window.
DVD Flick will ask for confirmation to proceed - press "Yes".
Additional warning about "Project destination folder" - Press "Yes".
"DVD Flick Progress" window shows to user all executed steps.
When the DVD burning will be done, we will see this window. Press "Close" to return to the DVD Flick main window. In the main window you can save DVD Flick project to your hard drive.
DVD Flick is only for Windows PC users. If you are Mac user, you can use this best DVD creator for Mac. It is a professional Mac DVD Burner program that converts almost all popular video formats such as FLV, MPEG1, MPEG2, MP4, DAT, 3GP, 3G2, MOV, AVI to DVD on Mac. And it can burn DVD movie playable on portable or home DVD player on Mac.
If you want to convert iTunes videos to DVD, you need to get the videos from iTunes to computer .
And then use DVD flick to convert iTunes videos to DVD for free.
If you want to burn YouTube videos on DVD, you can download the youtube videos to your computer.
And then using DVD flick to burn YouTube videos on DVD for free. If you are a Mac user, use this best dvd creator for Mac to help you. You can also copy videos form other video sites such as veoh, google video, iFlim, vidilife, blip.tv, music.com, zippyvideos, dailymotion, devilducky, etc and then burn them to DVD using this methods.
Here are some other DVD burner.
DVD Styler
DVD Styler is an open source DVD authoring system for Windows and Linux. It converts MPEG files, which you can drag and drop into its window, create NTSC/PAL DVD menus which are highly customizable (you can set image backgrounds, put text and images anywhere, change the font and colors, etc), set chapters for the movie, etc.
DivXtoDVD Perl Script
DivXtoDVD is a Perl script for Linux and other Posix systems (like BSD, Unix, Unix-like operating systems) that converts a DivX movie to DVD compliant files (AUDIO_TS and VIDEO_TS directories and files). It uses transcode, ffmpeg, mjpeg and dvdauthor to do the job in one step. The software is open source. Note that this is different from the commercial ConvertXtoDVD software which was also formerly named DivXtoDVD. If you're looking for the latter, a trial download is available.
ImgBurn
ImgBurn is a lightweight CD / DVD / HD DVD / Blu-ray burning application that everyone should have in their toolkit! It has several 'Modes', each one for performing a different task:
Read - Read a disc to an image file
Build - Create an image file from files on your computer or network - or you can write the files directly to a disc
Write - Write an image file to a disc
Verify - Check a disc is 100% readable. Optionally, you can also have ImgBurn compare it against a given image file to ensure the actual data is correct
Discovery - Put your drive / media to the test! Used in combination with DVDInfoPro, you can check the quality of the burns your drive is producing
Q DVD-Author
Q DVD-Author is essentially a GUI front-end for dvdauthor and other related tools found on a Linux system. You can create DVD menus, convert your projects between PAL and NTSC (and vice versa), create sub-menus, add subtitles, transcode your input videos from other formats, apply multiple audio streams to the videos, give menus multiple soundtracks, create a DVD slideshow, create animated menus, etc. This is an open source program that works under Linux and other Posix OSes.
KDE DVD Authoring Wizard
The KDE DVD Authoring Wizard allows you to create a DVD from a DVD-compatible MPEG-2 file (that is, it doesn't do the conversion from other formats for you). You can add multiple files and create a menu of the playlist if you wish. Your DVD menu can have multiple pages, a soundtrack from OGG or MP3, animated thumbnails and be in the NTSC or PAL format, be in 16:9 widescreen or 4:3 full screen, etc. This DVD authoring tool works under Linux. It is open source.
Motorola Unloads Infrastructure Unit on Nokia Siemens
Motorola has found a buyer for its network equipment business–a portion of it, anyway. Nokia Siemens Networks will pay $1.2 billion for most of Motorola’s network infrastructure operations, the companies announced Monday.
Under the terms of the deal, Motorola (MOT) will retain its wireless patent portfolio and iDEN assets, while Nokia Siemens acquires all that remains: the company’s GSM (Global System for Mobile Communications), CDMA (Code-Division Multiple Access), WCDMA (Wideband Code-Division Multiple Access), WiMax and LTE (Long-Term Evolution) operations, along with contracts to supply some 50 wireless carriers and cable companies, among them top wireless carriers like Verizon (VZ), Sprint Nextel (S) and KDDI in Japan.
Not a bad deal for Nokia Siemens, which had been struggling to bolster its presence in North America. The company last year bid in two auctions for Nortel Networks’ assets and lost both times, first to Ericsson and then to Ciena.
For Motorola, which has been looking to unload its network infrastructure business for quite some time now, the deal is an important step in its plan to spin off its mobile and cable set-top box divisions into a separate company early next year.
2010年7月18日星期日
IPhone 4 Recall? Get a Grip!
The growing morass of negative publicity over the iPhone 4’s antenna performance issue has some crisis communication experts arguing that Apple will be forced to recall the device to minimize damage to its brand. But analysts say that’s unlikely.
Though the clamor over a design issue that can diminish the iPhone 4’s signal strength might drag on the company’s shares, as it is today, Apple (AAPL) probably isn’t going to issue a product recall.
Said Piper Jaffray analyst Gene Munster, “We see [a recall] as a highly unlikely scenario given the issue is completely resolved with a case, which is a significantly less expensive solution for the company.”
Citigroup analyst Richard Gardner agreed.
“We consider the probability of a recall to be very low given our view that the issue in question is not serious enough to warrant a recall,” he said in a note to clients today. “While bridging two portions of the antenna with one’s hand on the lower-left corner of the phone does cause signal degradation, it does not typically result in dropped calls unless the signal from the cell tower is already weak. Excluding this issue, overall signal reception on iPhone 4 seems at least as good, if not slightly better, than reception on the iPhone 3GS.”
Over at Barclays Capital, Ben Reitzes offered a similar take. “As users, we have experienced some issues w/call drops; however, we have found drops go away after attaching a bumper accessory, which is quite useful anyway,” he wrote. “To date, we have not seen any overwhelming evidence of iPhone 4 units being returned.” And if the current spate of negative headlines should change that, well, it’s probably not going to have much of an effect on the company’s bottom line anyway.
Said Reitzes, “Worst case is some near-term sales are impacted and/or Apple revises its policy on ‘not giving away’ free bumpers, but usually demand just gets pushed to a slightly later date. Therefore, we do not believe these issues will impact Apple’s product momentum or the story materially at this time.”
To Reitzes, the iPhone 4 antenna issue is “overblown,” a sentiment shared by Munster as well.
“Ultimately we believe this PR black eye takes away some near-term upside potential to our iPhone estimates, but it does not change the long-term trajectory of the iPhone. While the issue has gained significant traction in the press, the reality is that we estimate this problem periodically affects 25 percent of iPhone 4 users given the fix is easy (a case for the iPhone), and 75 percent of customers choose to use a case anyway. While it has reached a boiling point, we believe the magnitude of this issue is being overblown.”
And seriously, an iPhone 4 recall? Steve Jobs would rather recall hiring John Sculley.
Three Ways to Download Music To Your Zune Player
There are several ways you can download your Zune movies, Zune music videos, Zune MP3's and Zune software to your Zune player.
1) The first is from the Microsoft Zune Marketplace and other Pay-Per-Download Sites which have movie downloads, music downloads, music video downloads, and more. The problem with downloading Zune files from places like Microsoft Zune Marketplace is the cost. The Microsoft Zune Marketplace charges a monthly subscription service called the "Zune Pass" with unlimited downloads for $14.99 per month. The pay-per-download sites charge on the average about $1.00 per Zune download. So, with a Zune player that has a 30 gigabyte hard drive whic allows users to store up to 7,500 Zune MP3s, 2,500 pictures or 100 hours of Zune movies and Zune music videos, that is going to cost a fortune to fill up.
2) WiFi - Microsoft Zune players has a technology called WiFi which allows friends and family to share Zune music, Zune movies, Zune software, pictures and Zune music videos both effortlessly and wirelessly. If you have a cool picture or something you found on a zune download site you can share it easily. Anytime you come in close range of another Zune player you can connect to that Zune player via WiFi and share your Zune downloads. The only drawback is you can only play a shared song only 3 times before it is deleted although, pictures are saved and can be viewed many times. It's a nice feature but needs improvement.
3) The third way is by ripping your music CD's to your Zune player. The definition of ripping means converting CD music files to a file format usable by your Zune player which is either in MP3 or WMA file format. After doing this, all you need to do is plug your Microsoft Zune player into your computer with a USB cable and transfer the ripped music files to your Zune player using the provided Zune software.
1. Put the music CD that you want ripped into your PC.
2. After the media player opens. Select the song you would like to copy and click on RIP.
3. Save the song you just ripped to a folder of your choice.
4. Plug in your Zune Player to your PC using the USB Cable. The Zune Software will automatically search for music that you saved in the folder on your PC. Select the files you want and manually drag and drop them into your Zune player's music folder.
Related theme:
New Zune review part 2-1
New Zune review part 2-2
New Zune review part 2-3
New Zune review part 2-4
Recommended Products:
DVD to Zune Converter
This Zune Converter can convert or rip DVD to what you want video/audio formats.
Zune Movie Converter
It supports convert video to Zune supporting video and audio format.
2010年7月16日星期五
How to sync and put cusomized ringtone on iPhone
There are also some other ways to convert audio to iPhone ringtone and sync it to iPhone with iTunes, but I think these are a little complicated and users may be at a loss with such ways.
Here I recommend iPhone PC Suite, an almighty iPhone manager that can let you manage phone book, software, media and other files between iPhone and computer without iTunes easily.
But before using this tool, make sure your iTunes installed and has been connected with iPhone once before (Then you will never need not run iTunes when you use iPhone PC Suite to manage your iPhone).And when the first time you connecting iPhone, it will install PhoneDaemon on your iPhone, don’t worry it is green software and will do nothing harm.
Now I will show you how to sync the converted iPhone ringtone to iPhone without iTunes. Connect you iPhone to computer, double click” iPhone PC Suite” to start iPhone PC Suite, the program will scan you iPhone automatically for a short while. Then click button “Personal” on the main menu, select ”ringtone”.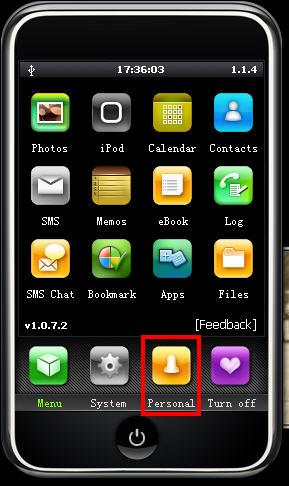
Click “New Ringtone” to locate the converted iPhone ringtone.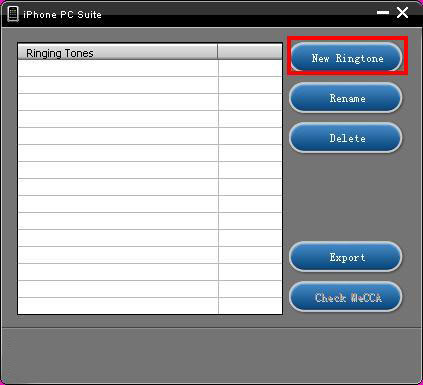
Select your target iPhone ringtone, then it will upload the ringtone to iPhone automatically.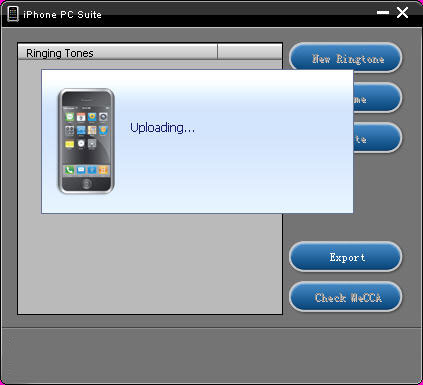
Then you can select your favorite audio file and set it as your iPhone ringtone on iPhone. Click “setting”->”Sound”->”Ringtone”, the converted ringtone is listed on column “Customize”. Now you can enjoy the fun of your unique iPhone ringtone!
This free iPhone PC Suite also has other powerful functions, we will share them later.
Previous part: How to convert DVD, Movie, Music to iPhone ringtone and put ringtone on iPhone?
2010年7月11日星期日
How to Rip DVDs to iPod, iPhone, etc. with Handbrake
Do you want to watch your DVDs on your iPod, iPhone or Apple TV? Here's a guide which explains how to use an excellent software - Handbrake to rip DVD's into MPEG-4 video files.
Requirements:
1. VLC player (Handbrake 0.9.3 and higher)
2. iTunes 6.0.1 or later
3. QuickTime 7.0.3 or later
4. 500 MHz processor or better with at least 16MB of video RAM
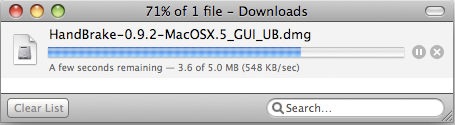
Step 1: Download Handbrake
Download Handbrake from here and install it. Handbrake is free. If you already have Handbrake installed, please check to see if your version is out of date. Several new improvements have been made recently to the program, specifically for the iPod and iPhone.
Step 2. Insert DVD
Grab a video DVD and put it into your computer. Handbrake can only convert standard video DVD's that you would normally play in a DVD player. If you have a DVD-ROM with video files saved on it as individual files (AVI, MPG, WMV, MOV, etc), Handbrake will NOT be able to convert these files. Handbrake only wants standard video DVD's.
Depending on your computer's preferences, the DVD Player application might automatically open. If it does, just quit it. Only one application should be accessing the DVD at a time.
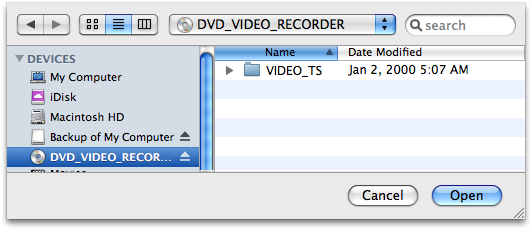
Launch Handbrake. A screen asking you to select a DVD will appear. Select the DVD you've inserted into your computer and press the Open button.
Step 3: Download VLC player
What version of Handbrake are you using? As of version 0.9.3, Handbrake will no longer natively rip DVDs. Weird right? I wonder if they were getting some pressure from the movie industry. But don't give up on Handbrake just yet. You can still use Handbrake 0.9.3 to rip DVDs, you just need to install VLC on your machine first.
If you see the VLC screen like the one shown below, then you need to download and install VLC.
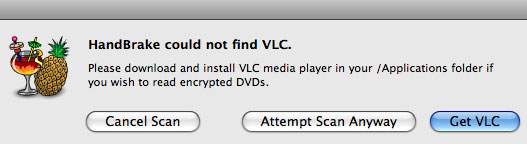
VLC Download Page:
http://www.videolan.org/vlc/
The VLC media player is a highly portable multimedia player for various audio and video formats (MPEG-1, MPEG-2, MPEG-4, DivX, mp3, ogg, etc.) as well as DVDs, VCDs, and various streaming protocols. It can also be used as a server to stream in unicast or multicast in IPv4 or IPv6 on a high-bandwidth network. Handbrake now uses some components of the VLC player and it must be installed if you want Handbrake to read DVDs.
The VLC media player is a highly portable multimedia player for various audio and video formats (MPEG-1, MPEG-2, MPEG-4, DivX, mp3, ogg, etc.) as well as DVDs, VCDs, and various streaming protocols. It can also be used as a server to stream in unicast or multicast in IPv4 or IPv6 on a high-bandwidth network. Handbrake now uses some components of the VLC player and it must be installed if you want Handbrake to read DVDs.
After you download VLC, you need to install it on Mac:
VLC for Mac OS X is distributed as a disk image. Download the .dmg file, open it, and copy VLC to your hard drive (for instance the /Applications folder). Open VLC by double-clicking on it.
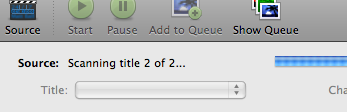
Step 4: Source Settings
Handbrake will now scan your DVD. This makes take up to a minute or two depending on the contents of the DVD and the speed of your optical drive.
Title: By default, Handbrake will select the longest title in the list. However, this may not be the content you want.
Movies: If you are ripping a movie, the longest title is usually the main feature.
TV Shows: If you are ripping a DVD containing TV shows, you should see a list of several titles all about the same length. The shorter titles on the DVD are usually the video backgrounds used in the DVD menu screens and DVD extras like movie trailers. Unless you are a graphic artist, you probably don't want these tracks.
The shorter titles on the DVD are usually the video backgrounds used in the DVD menu screens and DVD extras like movie trailers. Unless you are a graphic artist, you probably don't want these tracks.

If you only want to rip one title but aren't sure which one, you can click on the Picture Settings button (bottom right of the Handbrake interface) and manually step through several frames of the title to see what it looks like.
NOTE: Sometimes Handbrake is unable to see every track on a DVD. We've noticed issues with very old DVD's from the mid-1990s (before the days of fancy menus and Bonus features) and some newer DVD's like Stealth. There are different techniques and methods to authoring DVD's Sometimes the tracks get nested in weird ways that prevents Handbrake from seeing them. Other DVD ripping applications like Mac The Ripper and OSex might be able to see these tracks. Look for the longest track. That is probably the main feature.
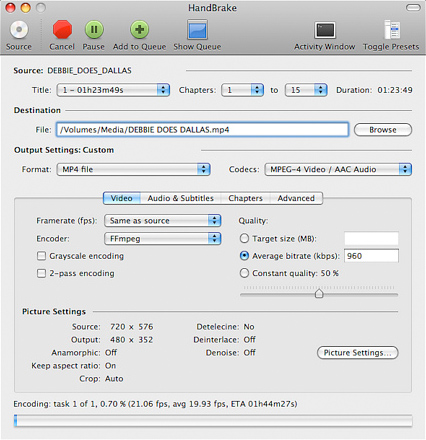
Step 5: Destination Settings
The Destination section has 3 settings you can modify: file format, codec and file destination.
File Destination: You can name your file and choose its destination using this box. Try to pick a location that has sufficient disk space to store the ripped file. On average, you need about 1 GB per full length movie.

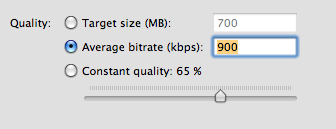
Step 6: Select A Preset
Handbrake has a variety of handy DVD ripping presets for iPod, iPhone, Apple TV, Xbox, Sony PSP and many more. Just select a preset and Handbrake will automatically fill in all the settings for you.
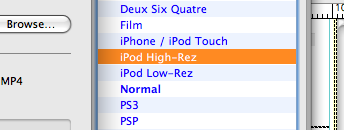
If you plan on watching this DVD on your iPod, iPhone or even Apple TV, we suggest you select iPod High-Rez and drop the average bitrate to 900 kbps. This will give you a nice high quality file that will work on both big (HDTVs) and small screens (iPod/iPhone) and won't take up a ton of hard drive space.
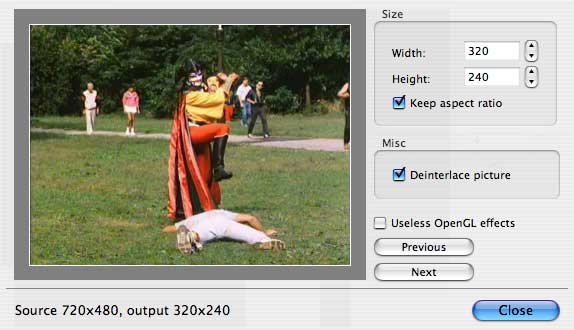
Step 7: Picture Settings
Click on the Picture Settings button to launch a separate window. The only thing you really want to do here is to compensate for interlaced or grainy, compressed looking video. Handbrake will have adjusted everything here for you based on the preset you selected.
Sometimes video files will have horizontal lines in them. This is called interlacing. To get rid of interlacing, try turning on the Deinterlace option and select "Fast." The image below is animated and will toggle between when the deinterlace option is turned on or off. You can really see the difference around the edge of the flipper.
Denoise will help get rid of graininess and Deblock will help clean up blocky or compressed looking video. Experiment and try to make your video clip look the best possible.
NOTE: Your iPod really only wants video files that are 320 pixels wide by 240 wide. If you don't plan on watching this ripped DVD on anything else, you can mess around with the settings. Turn on the "Keep aspect ratio button" and decrease the Width until it says 320. Handbrake will auto-adjust the height to match the width. If your video source is 3:4 (full-screen), the height will be 240. For wide-screen content, the height will be a lower number. This is fine and isn't something to worry about.
But if you plan on watching this video on your TV with an Apple TV or an iPod Video dock, then you should keep the video size big. If you don't have the money for an Apple TV, there's this amazing iPod video dock called the Keyspan TuneView. If you want to hook your iPod Video up to your TV, you should check out the TuneView.
Step 8: Rip
Finally! Click on the Rip button and stand back. The encoding time will depend on several variables including: the duration of the video file, the speed of your computer, what other activity your computer is currently doing, the codec you selected (H264 or MP4) and if you decided to do a 2-pass encoding or not.

Handbrake will attempt to provide you with an ETA. The time will increase if you Pause the encode or do anything that will hog the processor like start a 3D render in Maya. We suggest you do your DVD ripping overnight or at a time when you don't need to use your computer.
Handbrake will attempt to provide you with an ETA. The time will increase if you Pause the encode or do anything that will hog the processor like start a 3D render in Maya. We suggest you do your DVD ripping overnight or at a time when you don't need to use your computer.
Step 9: Import Into iTunes
Connect your iPod Video or iPhone to your computer using the cable it came with and open iTunes (Applications > iTunes).
Drag and drop the video file into your iTunes library, or select Add to Library... from the File menu.
Make sure the video file you just added to iTunes is in a Playlist that will get synced to your device.
Select "Sync"
The sync may take a few minutes. Once the import completed, you could find the file which is ripped by Handbrake on your iPod or iPhone.
Requirements:
1. VLC player (Handbrake 0.9.3 and higher)
2. iTunes 6.0.1 or later
3. QuickTime 7.0.3 or later
4. 500 MHz processor or better with at least 16MB of video RAM
Step 1: Download Handbrake
Download Handbrake from here and install it. Handbrake is free. If you already have Handbrake installed, please check to see if your version is out of date. Several new improvements have been made recently to the program, specifically for the iPod and iPhone.
Step 2. Insert DVD
Grab a video DVD and put it into your computer. Handbrake can only convert standard video DVD's that you would normally play in a DVD player. If you have a DVD-ROM with video files saved on it as individual files (AVI, MPG, WMV, MOV, etc), Handbrake will NOT be able to convert these files. Handbrake only wants standard video DVD's.
Depending on your computer's preferences, the DVD Player application might automatically open. If it does, just quit it. Only one application should be accessing the DVD at a time.
Launch Handbrake. A screen asking you to select a DVD will appear. Select the DVD you've inserted into your computer and press the Open button.
Step 3: Download VLC player
What version of Handbrake are you using? As of version 0.9.3, Handbrake will no longer natively rip DVDs. Weird right? I wonder if they were getting some pressure from the movie industry. But don't give up on Handbrake just yet. You can still use Handbrake 0.9.3 to rip DVDs, you just need to install VLC on your machine first.
If you see the VLC screen like the one shown below, then you need to download and install VLC.
VLC Download Page:
http://www.videolan.org/vlc/
The VLC media player is a highly portable multimedia player for various audio and video formats (MPEG-1, MPEG-2, MPEG-4, DivX, mp3, ogg, etc.) as well as DVDs, VCDs, and various streaming protocols. It can also be used as a server to stream in unicast or multicast in IPv4 or IPv6 on a high-bandwidth network. Handbrake now uses some components of the VLC player and it must be installed if you want Handbrake to read DVDs.
The VLC media player is a highly portable multimedia player for various audio and video formats (MPEG-1, MPEG-2, MPEG-4, DivX, mp3, ogg, etc.) as well as DVDs, VCDs, and various streaming protocols. It can also be used as a server to stream in unicast or multicast in IPv4 or IPv6 on a high-bandwidth network. Handbrake now uses some components of the VLC player and it must be installed if you want Handbrake to read DVDs.
After you download VLC, you need to install it on Mac:
VLC for Mac OS X is distributed as a disk image. Download the .dmg file, open it, and copy VLC to your hard drive (for instance the /Applications folder). Open VLC by double-clicking on it.
Step 4: Source Settings
Handbrake will now scan your DVD. This makes take up to a minute or two depending on the contents of the DVD and the speed of your optical drive.
Title: By default, Handbrake will select the longest title in the list. However, this may not be the content you want.
Movies: If you are ripping a movie, the longest title is usually the main feature.
TV Shows: If you are ripping a DVD containing TV shows, you should see a list of several titles all about the same length. The shorter titles on the DVD are usually the video backgrounds used in the DVD menu screens and DVD extras like movie trailers. Unless you are a graphic artist, you probably don't want these tracks.
The shorter titles on the DVD are usually the video backgrounds used in the DVD menu screens and DVD extras like movie trailers. Unless you are a graphic artist, you probably don't want these tracks.
If you only want to rip one title but aren't sure which one, you can click on the Picture Settings button (bottom right of the Handbrake interface) and manually step through several frames of the title to see what it looks like.
NOTE: Sometimes Handbrake is unable to see every track on a DVD. We've noticed issues with very old DVD's from the mid-1990s (before the days of fancy menus and Bonus features) and some newer DVD's like Stealth. There are different techniques and methods to authoring DVD's Sometimes the tracks get nested in weird ways that prevents Handbrake from seeing them. Other DVD ripping applications like Mac The Ripper and OSex might be able to see these tracks. Look for the longest track. That is probably the main feature.
Step 5: Destination Settings
The Destination section has 3 settings you can modify: file format, codec and file destination.
File Destination: You can name your file and choose its destination using this box. Try to pick a location that has sufficient disk space to store the ripped file. On average, you need about 1 GB per full length movie.
Step 6: Select A Preset
Handbrake has a variety of handy DVD ripping presets for iPod, iPhone, Apple TV, Xbox, Sony PSP and many more. Just select a preset and Handbrake will automatically fill in all the settings for you.
If you plan on watching this DVD on your iPod, iPhone or even Apple TV, we suggest you select iPod High-Rez and drop the average bitrate to 900 kbps. This will give you a nice high quality file that will work on both big (HDTVs) and small screens (iPod/iPhone) and won't take up a ton of hard drive space.
Step 7: Picture Settings
Click on the Picture Settings button to launch a separate window. The only thing you really want to do here is to compensate for interlaced or grainy, compressed looking video. Handbrake will have adjusted everything here for you based on the preset you selected.
Sometimes video files will have horizontal lines in them. This is called interlacing. To get rid of interlacing, try turning on the Deinterlace option and select "Fast." The image below is animated and will toggle between when the deinterlace option is turned on or off. You can really see the difference around the edge of the flipper.
Denoise will help get rid of graininess and Deblock will help clean up blocky or compressed looking video. Experiment and try to make your video clip look the best possible.
NOTE: Your iPod really only wants video files that are 320 pixels wide by 240 wide. If you don't plan on watching this ripped DVD on anything else, you can mess around with the settings. Turn on the "Keep aspect ratio button" and decrease the Width until it says 320. Handbrake will auto-adjust the height to match the width. If your video source is 3:4 (full-screen), the height will be 240. For wide-screen content, the height will be a lower number. This is fine and isn't something to worry about.
But if you plan on watching this video on your TV with an Apple TV or an iPod Video dock, then you should keep the video size big. If you don't have the money for an Apple TV, there's this amazing iPod video dock called the Keyspan TuneView. If you want to hook your iPod Video up to your TV, you should check out the TuneView.
Step 8: Rip
Finally! Click on the Rip button and stand back. The encoding time will depend on several variables including: the duration of the video file, the speed of your computer, what other activity your computer is currently doing, the codec you selected (H264 or MP4) and if you decided to do a 2-pass encoding or not.
Handbrake will attempt to provide you with an ETA. The time will increase if you Pause the encode or do anything that will hog the processor like start a 3D render in Maya. We suggest you do your DVD ripping overnight or at a time when you don't need to use your computer.
Handbrake will attempt to provide you with an ETA. The time will increase if you Pause the encode or do anything that will hog the processor like start a 3D render in Maya. We suggest you do your DVD ripping overnight or at a time when you don't need to use your computer.
Step 9: Import Into iTunes
Connect your iPod Video or iPhone to your computer using the cable it came with and open iTunes (Applications > iTunes).
Drag and drop the video file into your iTunes library, or select Add to Library... from the File menu.
Make sure the video file you just added to iTunes is in a Playlist that will get synced to your device.
Select "Sync"
The sync may take a few minutes. Once the import completed, you could find the file which is ripped by Handbrake on your iPod or iPhone.
2010年7月9日星期五
Ballmer to Keynote CES Again; Bidding Soars for NoDoz Concession
Microsoft (MSFT) CEO Steve Ballmer will return to the Consumer Electronics Show next January, kicking it off with another presumably lackluster keynote.
This will be Ballmer’s third time headlining CES, and after his first two appearances, I don’t think anyone’s expecting too much. The highlight of his 2009 keynote: The widely expected announcement of the Windows 7 beta. The highlights of his 2010 address: An ill-starred Windows-based tablet and Project Natal, a controllerless game interface system the company debuted at E3 months earlier.
Exciting stuff.
Said Consumer Electronics Association President and CEO Gary Shapiro, “As leader of one of the world’s most innovative technology companies, a keynote address from Steve Ballmer is the perfect way to kick off the 2011 International CES.”
Wonder what we have to look forward to this year? A new Windows 7 service pack?
2010年7月6日星期二
Jeff Bezos’s Mission: Compelling Small Publishers to Think Big
Jeff Bezos has been dismissed before. For most of the dot-com boom, he was assumed to be a one-shot wonder, inches away from having his bookstore, Amazon.com, extinguished by Wal-Mart. Now, with Apple’s mad rush into books and readers, people are starting to wonder again.
Okay, Kids, Play on My Lawn
I was a fool for mentioning video games in the first place. I would never express an opinion on a movie I hadn’t seen. Yet I declared as an axiom that video games can never be Art. I still believe this, but I should never have said so. Some opinions are best kept to yourself.
At this moment, 4,547 comments have rained down upon me for that blog entry. I’m informed by Wayne Hepner, who turned them into a text file: “It’s more than ‘Anna Karenina,’ ‘David Copperfield’ and ‘The Brothers Karamazov.’” I would rather have reread all three than vet that thread. Still, they were a good set of comments for the most part. Perhaps 300 supported my position. The rest were united in opposition.
They are mostly intelligent, well-written, and right about one thing in particular: I should not have written that entry without being more familiar with the actual experience of video games.
2010年7月4日星期日
How to transfer music from iPod
Basically, there is a need for you to transfer music from iPod with iPod Rip and iPod Rip for Mac to avoid your files are lost. Now, I guide you how to Rip your iPod to hard drives with Aiseesoft iPod to Computer Transfer. So you don’t need to worry about losing anything.
Step 1: Download Aiseesoft iPod to Computer Transfer and install.
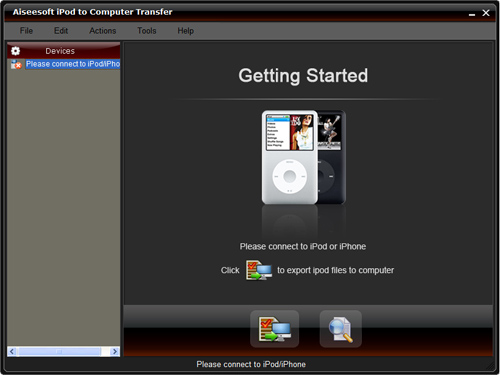
Step 2: Launch the program
Double-click the icon to run the software; or launch it from the “Start” Menu.
Step 3: Rip iPod files.
1) Run the software, and connect your iPod/iPhone to your computer via USB cable. After done, the iPod/iPhone icon and its library and playlists will appear in the Device list.
2) Open the library/playlist that you want to export files, and then check the music/movie you want to export in the file list to your computer.
3) Click the "Export to PC" button to select the destination of the exporting files and start ripping files
Otherwise, you could also choose the Export to local option from the Actions menu, and then export the files from your iPod/iPhone to actual device.
Tip: Use “Track filter” function to help you quickly browse your library by genre, artist and album. If you are using Mac, please use the iPod Rip for Mac software.
iPod Rip for Mac download.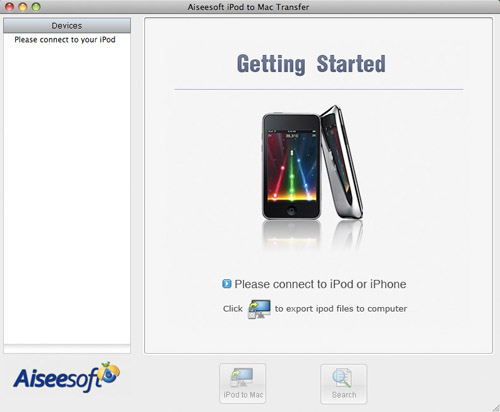
Using Windows Movie Maker to edit videos on PC for free
This is a tutorial which explains the process of editing videos on a PC using Windows Movie Maker and editing videos on Mac using iMovie. This tutorial will be a concise explanation of how to editing videos for free. Then share your movie via the Web, e-mail, or CD. Using dvd burner you can even take movies you've made and turn movies into DVDs.
You can also save your movie back to the video tape in your camera to play back on a TV or on the camera itself.
This tutorial includes three parts, this is part one:
Part 1. Using Windows Movie Maker to edit videos on PC for free
Part 2. Using iMovie to edit videos on Mac for free
Part 3. A table that compares free video editors.
Windows Movie Maker 2.1 makes home movies amazingly fun. With Movie Maker 2.1, you can create, edit, and share your home movies right on your computer. Build your movie with a few simple drag-and-drops. Delete bad shots and include only the best scenes.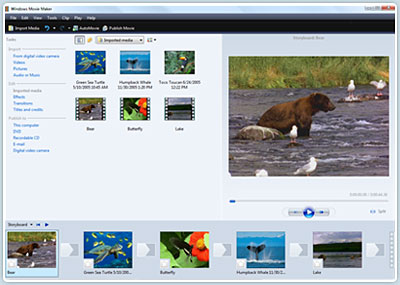
Step 1, Capture video
You can capture video from video device, import video, pictures, audio and music. MM2 will allow you to import the following file formats:
- Audio files: .aif, .aifc, .aiff .asf, .au, .mp2, .mp3, .mpa, .snd, .wav and .wma
- Picture files: .bmp, .dib, .emf, .gif, .jfif, .jpe, .jpeg, .jpg, .png, .tif, .tiff, and .wmf
- Video files: .asf, .avi, .m1v, .mp2, .mp2v, .mpe, .mpeg, .mpg, .mpv2, .wm, and .wmv
If your videos are not the formats compatible with Windows Movie Maker such as MP4/3GP, FLV and MOV, MIDI, AIFF, AAC, you can use the video converter to convert the video to the formats supported by MM2 first.
Step 2, Edit movie
-Add Video Transitions.
Open your Windows Movie Maker project file. If Movie Maker opens in Timeline view, return to Storyboard view by clicking on the Show Storyboard link. From the Movie Tasks pane, under Edit Movie, select View video transitions . Choose the desired transition, select and drag into storyboard between desired clips. After inserting transition, sample the change in the Monitor to determine if it works in the way you desire. To change a transition you can Undo the action, right click on the transition in the Storyboard and select delete, or simply drag a new transition over the old transition.
-Add Video Effects.
Choose "View video effects" under the Edit Movie section and drag the chosen effect to the star in the lower left corner of the picture. Preview your movie to see the effects. Continue to add effects to other pictures if desired. Save the file. A video effect applies to the picture itself rather than the change from one picture to another as in a transition.
-Add Titles and Credits.
Under the Edit Movie section, choose Make titles or credits. You have several options for where to place your Windows Movie Maker title and credits. They may precede or follow a picture or video clip, or be used as an overlay.
Here are tips for you to add special effects to your movies using Windows Movie Maker
Step 3, Finish movie
Now that your movie is complete, you may wish to save the project in a different format.
Saving the project and saving the movie are two different things. The movie project is the working file so that you may continue to edit until you have a final version of your work completed. The movie file is the final output of your movie.
Windows Movie Maker compresses all the parts of your movie into a single unit. The file size is much smaller so that it can be used on a web site or emailed.
You also have the option to create a CD or DVD of your movie. These options are all under the heading Finish Movie. If you want to convert the movie made by Windows Movies Maker to other video format such as YouTube video, AVI, MP4, 3GP, you can use this video converter. You can also use free third-party software to burn the movie made by Windows Movies Maker to DVD for free.
2010年7月2日星期五
Everything to PSP
How to watch YouTube on PSP, convert videos for PSP and put DVD movies on PSP? Many PSP users don’t know that. As a crazy PSP fan, I collect some tips that I think are the main steps to go into the world of PSP and share them with all PSP fans here, hope everyone can fully enjoy the fun of PSP.
It will include the following parts:
1. How to watch Youtube video on PSP directly with wifi internet
2. How to rip DVD and convert video to PSP
3. How to download and convert youtube video to PSP for free
4. How to transfer video to PSP
5. How to downgrade PSP
6. How to download free limewire music and video to PSP
7. Where to download free games to PSP
Part1. How to watch YouTube video on PSP directly with wifi internet?
As PSP's web browser only support the older version of flash while YouTube uses flash 9, if you want to watch YouTube on PSP directly with the wifi, you must upgrade to the newest firmware f and install a flash player on your PSP. A Japanese developer NekoMiMi has achieved that with PSPTube. Here are the steps:
Download the PSPTube from here http://www.PSP-hacks.com/file/1225 and open the zip file. Now before putting it in your PSP open the PSPTube.cfg file and press ctrl + F, and type in "DEV" press until you find Dev id="".
Ok now go to http://www.youtube.com/dev create an account and insert the account in between the arentheses.
Extract the PSPTube from the 200over folder and put it in GAME352 folder (Set the Kernel to the 352) Now open it in the PSP and choose an internet connection with the Circle button, it may say no videos, press circle and you'll be able to search.
Here is the control info:
X: Cancel; O: Accept; L/R: Last/Next Page; Start: Pause;
Select: Change aspect ratio (Original Size, Full screen)
Part2. How to rip DVD and convert video to PSP
PSP can play only MP4 video, DVD movie is MPEG-2 video and has CSS protected, so you have to rip the DVD movie to MP4, and then transfer it to PSP, If you stick with freeware, you can use DVD Shrink to rip the DVD to computer, and then use PSP Video 9 to convert the ripped file to MP4 video. As for me, I’d prefer using Aiseesoft PSP Movie Creator, it can rip protected DVD movie and convert video to MP4 video, more over, you can also trim or crop the DVD movie to enjoy the video on PSP with full screen, that’s really cool. What you have to do just put your DVDs on your DVD drive, and then click start button to begin the conversion. If you want to learn more about it, you can refer to its official site:
http://www.aiseesoft.com/psp-movie-creator.html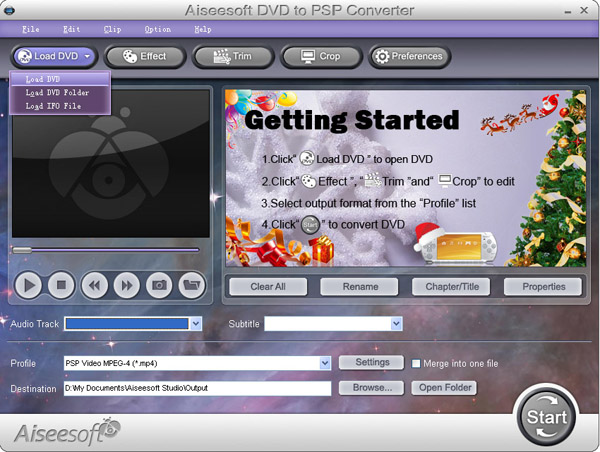
Part3. Download free YouTube video to PSP?
YouTube is a place everybody knows for free videos, I often download free videos from it, but the downloaded YouTube video is flv format, so a flv converter is necessary, you can go to this website: http://vixy.net/ .It's a free online FLV converter. Then go to YouTube and find a video that you loved. Copy the URL that in the Red box. Like this format:
http://www.youtube.com/watch?v=sdUUx5FdySs
Then Paste your video URL to the input box (figure above), choose the right format you want. If you want to edit the video, AVI is a good choice. And MP4 is fit for iPod, PSP and other MP4 players, click “start” to start the conversion. When the conversion finished, you will get the download link of the output video. Click the download link to download the video and save it in your computer, then copy the MP4 video to the “Video” folder in the PSP memory stick.
Part4. How to transfer video to PSP
You can download this free PSP video manager, it’s totally free, it can help you transfer MP4 video to PSP directly; fully support all firmware versions of PSP. Here is the download link
http://www.youtubetoipod.biz/software/psp-video-manager.html
what you have to do just add your MP4 video files to the software, connect your PSP to computer via the USB model, and then click Move, done.
Part5. How to downgrade PSP
All downgrades have a chance of bricking PSP, so if you want to, you must aware that there is always some level of risk.
Part6. How to download free limewire music and video to PSP
If you like to download free music and video to PSP, limewire is surely your right hand; you can download limewire software free from its official site: http://www.limeware.com, install and run it, then type key words to search the music and video you’re interested in, and then download it.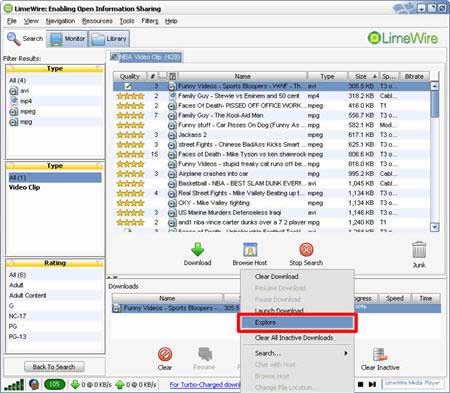
When you finished download the video, export and located it on your computer. Coz PSP can play only MP4 video, so you have to convert your video, I’d prefer using Aiseesoft PSP Movie Converter to convert video, and help you transfer video to PSP, so you will not be confused by the complicated PSP rule. If you don’t know how to use it, here is a step by step guide about how to use it.
http://www.aiseesoft.com/article/psp-movie-converter.html
Part7. Where to download free games to PSP
I collect some websites to download free PSP games, you can take them for reference, because some just provides a part of free games, please take care of the virus embedded in free games you‘d better install anti-virus software.
http://www.gamespot.com
http://www.PSPblender.com/PSP_games.php
http://www.allPSPgames.com
http://www.bigfishgames.com/
http://www.play4freeonlinegames.com/
http://www.khemer.com/
http://www.gamersenterprise.com
http://www.gamesjax.com/
http://www.playitontheweb.com/
http://www.topstylegames.com/
http://www.playgames2.com/games/Turret-Pong
Free Trial: Download Aiseesoft PSP Movie Creator
订阅:
博文 (Atom)